Access
The Access Management page is where you manage administrative roles and subscription templates for your platform.
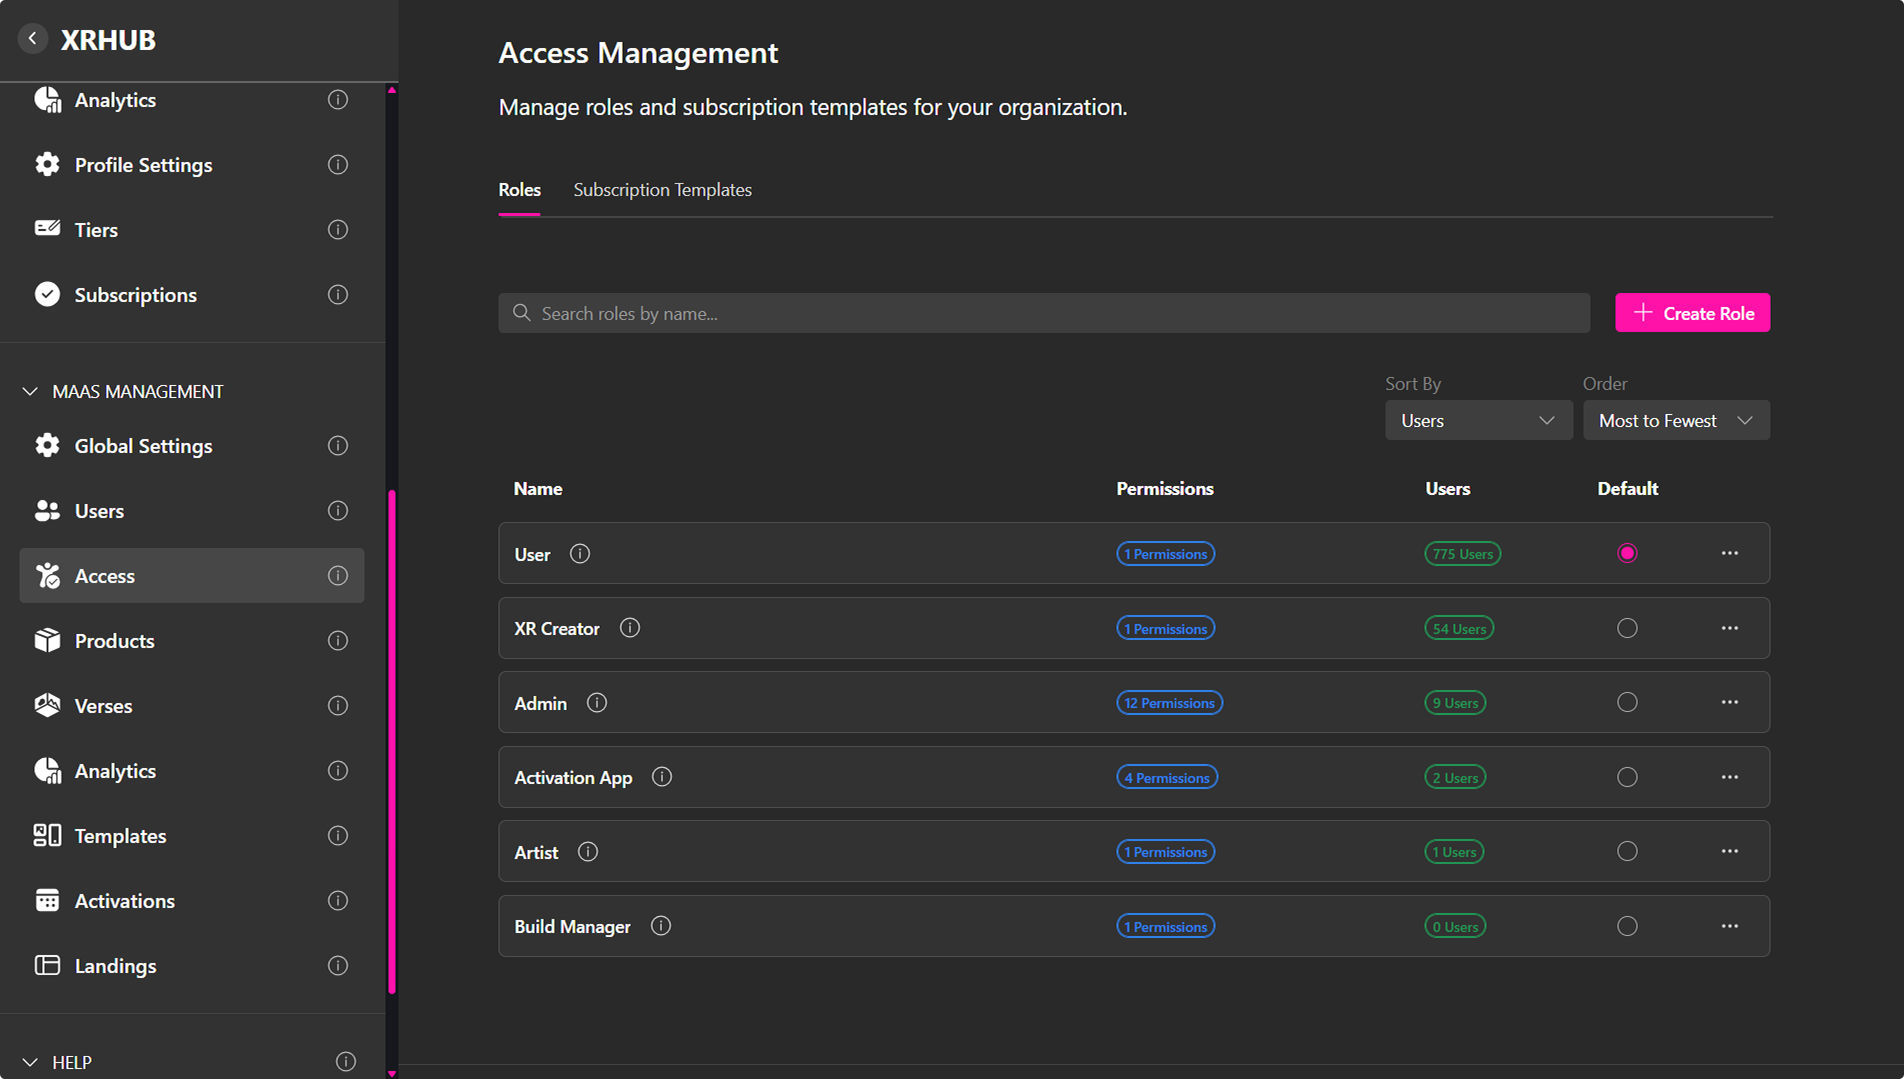
It is separate from User Management and controls two different aspects of platform access:
- Roles – Define additional administrative and management permissions, determining which platform management features a user can access.
- Subscription Templates – Define how many platform resources a user can use, such as storage, concurrent users, projects, workspaces, Verse instances, and media resources.
Roles
The Roles tab is used to create and manage roles that provide users with additional administrative or platform management permissions.
Roles do not define a user's subscription limits. Instead, they determine which management areas and administrative actions the user is authorized to access.
Create a Role
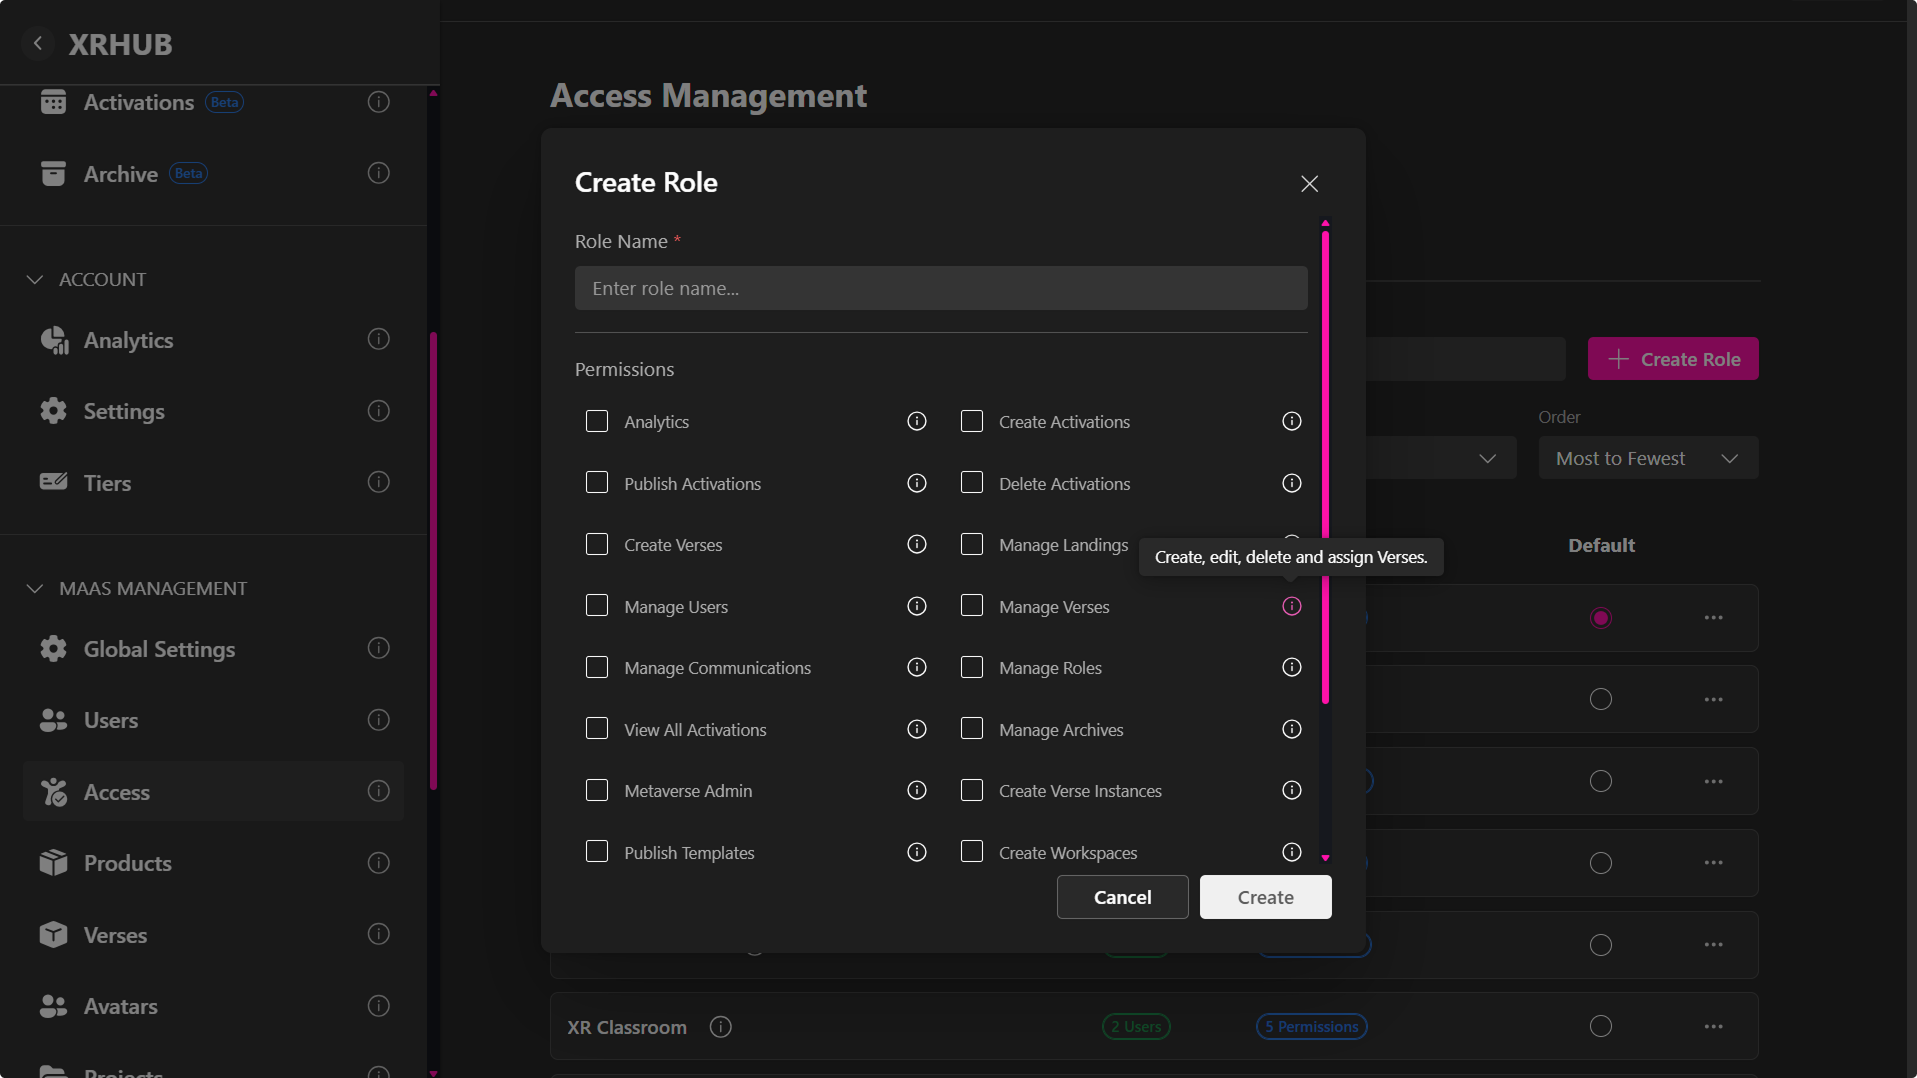
- Click the Create Role button.
- Enter a Role Name.
- Enable the permissions needed, such as:
- Analytics – Allows the user to access and view the analytics dashboard of the whole platform, including statistics, usage insights, and performance charts.
- Manage Users – Enables full control over user accounts: inviting new users, editing profiles, assigning or removing roles, managing subscriptions, and deleting accounts. (Related: User Management)
- Manage Communications – Allows the user to view and respond to user messages, feedback submissions, and bug reports across the platform.
- Manage Content – Allows the user to manage Projects, Verses, and Activations across the entire platform, including content created by other users.
- Manage Roles – Allows the user to create, edit, and manage administrative roles and configure their associated permissions.
- Manage Landings – Allows the user to create, edit, delete, and publish landing pages across the platform. It also grants permission to publish content to the root route. (Related: Landing Management)
- Publish in Explore – Allows public resources to appear in the Explore section, making them discoverable by other users.
- Create Subdomains – Allows users to create and manage branded subdomains for their organization or workspace.
- Click Create.
Note: Roles should be used when a user needs additional administrative or management access. Platform resource allowances are managed separately through Subscription Templates.
Managing Roles
Each role includes a ⋯ menu with:
- Edit Role – Update the role name or change its management permissions.
- Delete – Permanently remove the role.
If a role is deleted, users assigned to that role are automatically moved to the default role.
The Default option can be used to identify the role that should be assigned by default when someone creates an account on the platform.
Subscription Templates
Subscription Templates define how many resources users can use across the platform.
Instead of controlling administrative permissions, these templates establish usage limits for features such as storage, media, Projects, Workspaces, Pages, and Verse resources.
Subscription Templates can also be associated with Tiers from the Sellables page, allowing purchased Tiers to grant a predefined set of platform resources.
Create a Subscription Template
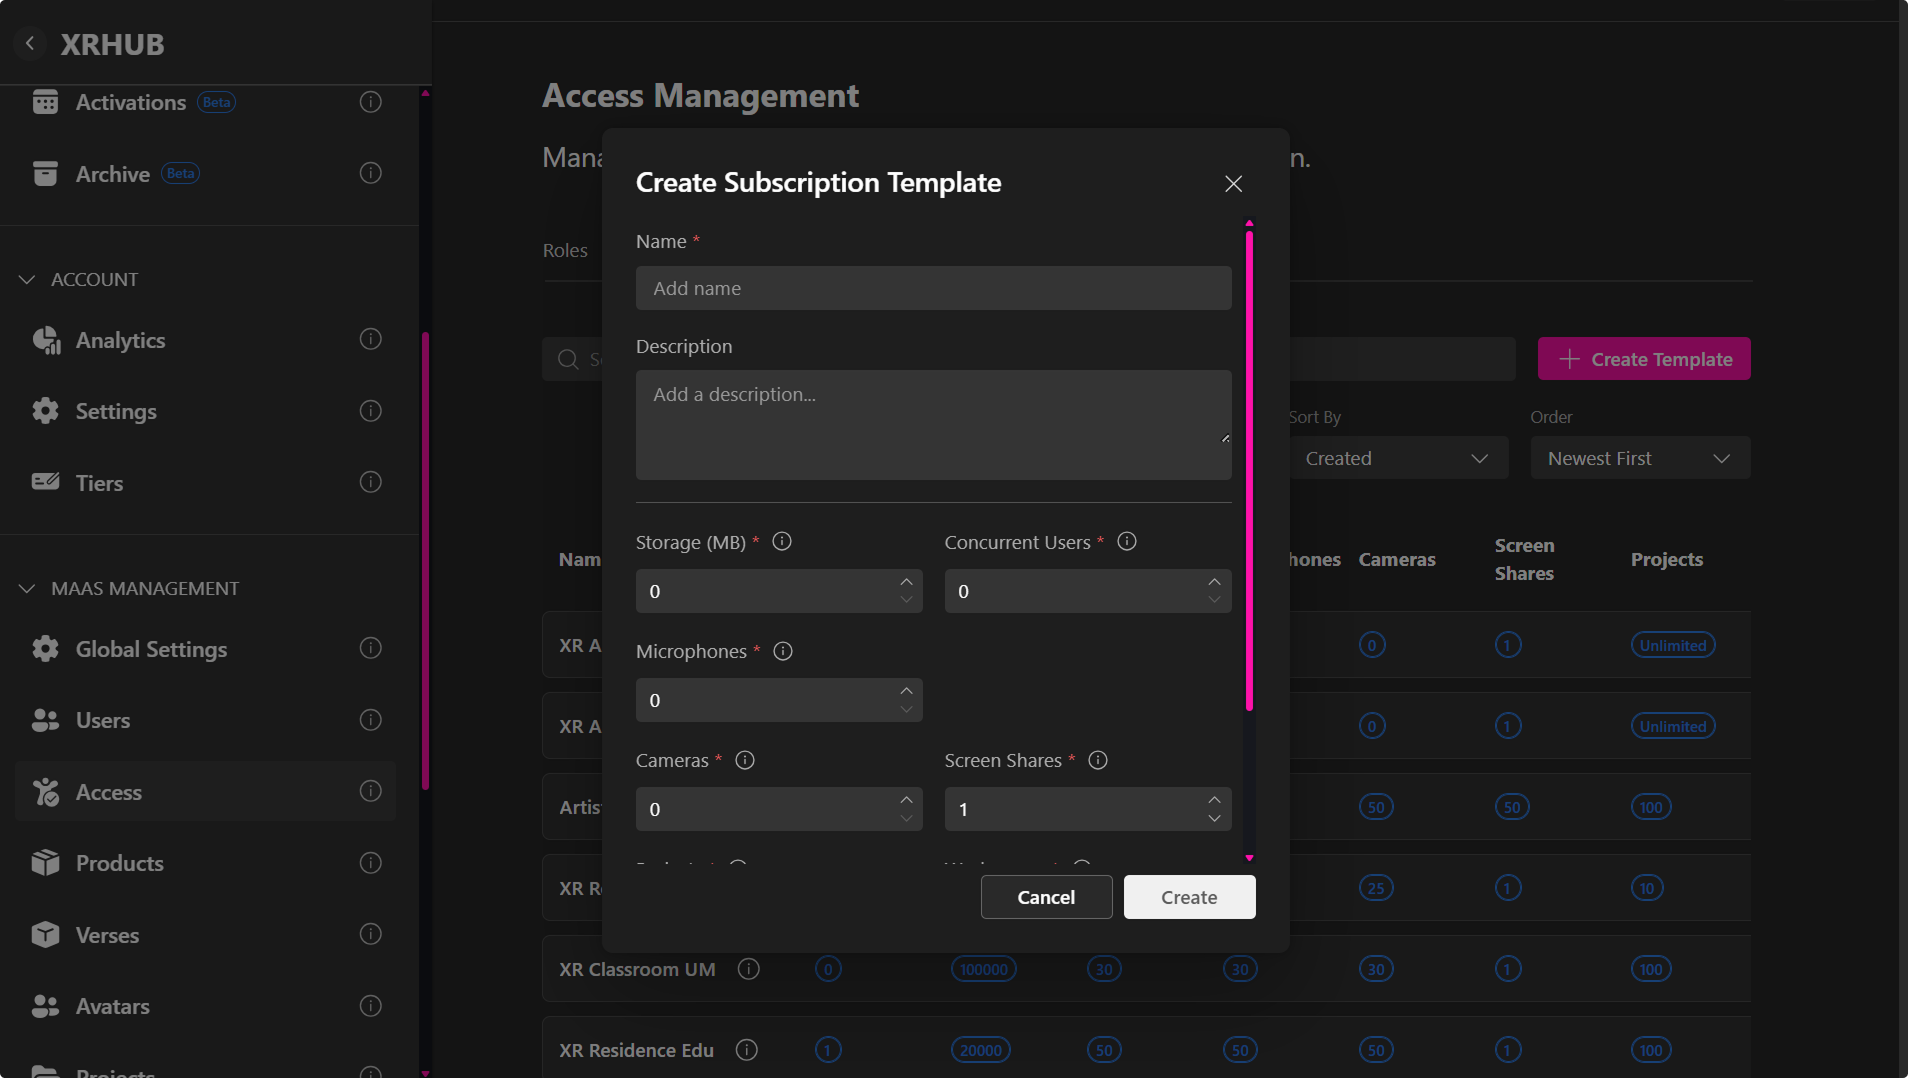
- Click Create Template.
- Enter a Name and an optional Description.
- Configure the desired resource limits:
- Storage (MB) – Maximum storage available for uploaded assets such as images, videos, audio, documents, and 3D models.
- Concurrent Users (CCU) – Maximum number of users who can simultaneously access the user's published Verses.
- Microphones – Maximum number of participants who can use microphones simultaneously.
- Cameras – Maximum number of participants who can stream their cameras simultaneously.
- Screen Shares – Maximum number of concurrent screen-sharing sessions.
- Projects – Maximum number of Projects the user can create.
- Workspaces – Maximum number of Workspaces the user can create.
- Workspace Members – Maximum number of members available within Workspaces.
- Instant Access – Maximum number of Instant Access entries available.
- Verses Instances – Maximum number of Verse instances available.
- Active Asset Embeds – Maximum number of active asset embeds available.
- Room Media Quality – Defines the media quality available in rooms.
- Build History – Maximum number of builds that can be retained in build history.
- Pages – Maximum number of Pages users can create.
- Click Create to save the Subscription Template.
After creating a Subscription Template, it can be used in several ways:
- Assign it to a Tier – The template becomes available from the Subscription Template dropdown when creating or editing a Tier, defining the resources included with that Tier.
- Assign it directly to an individual user – Apply a specific set of resource limits to a user without requiring them to purchase or be associated with a Tier.
- Assign it to a group of users – Apply the same resource limits to multiple users through a group.
🔹 Pro Tip: Use Subscription Templates to standardize resource limits across Tiers, individual users, and groups. This keeps resource configurations consistent and makes them easier to manage and reuse across the platform.
Managing Subscription Templates
Each Subscription Template includes a ⋯ menu with:
- View Details – Open the template to review its resource limits, assigned users, and associated Tiers/products.
- Edit – Modify the resource limits configured for the template.
- Delete – Permanently remove the Subscription Template.
View Template Details
Select View Details to open the Subscription Template.
At the top of the page, you can review the resource limits currently configured for the template.
The details page also provides tabs for reviewing assignments and associations, including:
- Users – Displays users currently or previously assigned to the template, including their provider, status, start date, and end date.
- Products – Displays the sellable products/Tiers associated with the Subscription Template.
For users assigned to the template, the Status indicates whether their access is currently Active or Expired.
Each user also includes a ⋯ menu with:
- Remove from Template – Remove the Subscription Template from that user.
Delete a Subscription Template
- Open the ⋯ menu for the Subscription Template.
- Select Delete.
- Confirm the deletion.
Deleting a Subscription Template removes the template itself but does not delete the users associated with it.